Deploying a secured Node.js Application on AWS EC2 Instance from scratch (Detailed Guide)
Table of contents
- Create an AWS EC2 Instance
- Connect to your Instance
- Install NPM/&Node
- Import your Source code
- NPM install your dependencies
- Run your code locally
- Create and manage a node service with systemd
- Install and setup NGINX as a reverse proxy server
- Create name servers for your domain in Route 53
- Get SSL certificates and enable HTTPS
- Conclusion
Every website or web application you have ever come across on the internet contains code deployed there by someone like you (or by aliens; I can't tell the extent of their involvement at this time) and for you as a web/software developer, knowing how to deploy your code to the streets of the internet via a remote server such as cloud servers is an invaluable skill to have today. There are several decent hosting services around that enable you to properly and securely host your website or web app such as Digital Ocean, Heroku, Vercel (mostly for front-end apps) and chief amongst them, Amazon Web Services (AWS).
Today, you will learn how to deploy your node.js project to the internet via an Amazon Web Services EC2 Instance at little or no cost. You will learn how to create an AWS EC2 Instance and work in Amazon Linux 2, create and manage services with SYSTEMD, use NGINX as a reverse proxy and obtain an SSL certificate from Let's Encrypt to ensure your website is secure via HTTPS protocol. So let’s get to it and deploy your project to your EC2 Instance.
Create an AWS EC2 Instance
As I said in my last post, Amazon Elastic Compute Cloud (AWS EC2) is an Infrastructure as a service (IAAS) cloud service provided by Amazon.com that enables you to rent a virtual machine where you can host and run your computer applications. Amazon EC2 provides you with what is called an Instance, which is a web service you can use to initialize an Amazon Machine Image (AMI) to configure your virtual machine that contains your software. AWS also offers services like AWS CLI, AWS S3, AWS CodeDeploy, and AWS Elastic Beanstalk to further streamline deployment and management.
In my previous post, I gave a detailed description of how to create and set up an AWS EC2 in just a few minutes, You should check out How to create and set up an AWS EC2 Instance.
Connect to your Instance
There are numerous ways to connect to your AWS EC2 (Elastic Compute Cloud) instance, providing flexibility and accessibility tailored to your needs. One of the most common methods is through SSH (Secure Shell), which allows you remote and secure access to your Instance through the command line. Another option is using AWS Systems Manager Session Manager, a browser-based SSH-like interface that doesn't require you to open incoming ports on your instance. Additionally, you can connect via Remote Desktop Protocol (RDP) for Windows instances which enables graphical desktop access, or utilize AWS SSM Run Command for executing commands remotely. For web applications, you can access your EC2 instance through a web browser by configuring security groups and setting up a web server. AWS also offers the EC2 Instance Connect feature, enabling one-click browser-based SSH access as I have illustrated in the gif below.
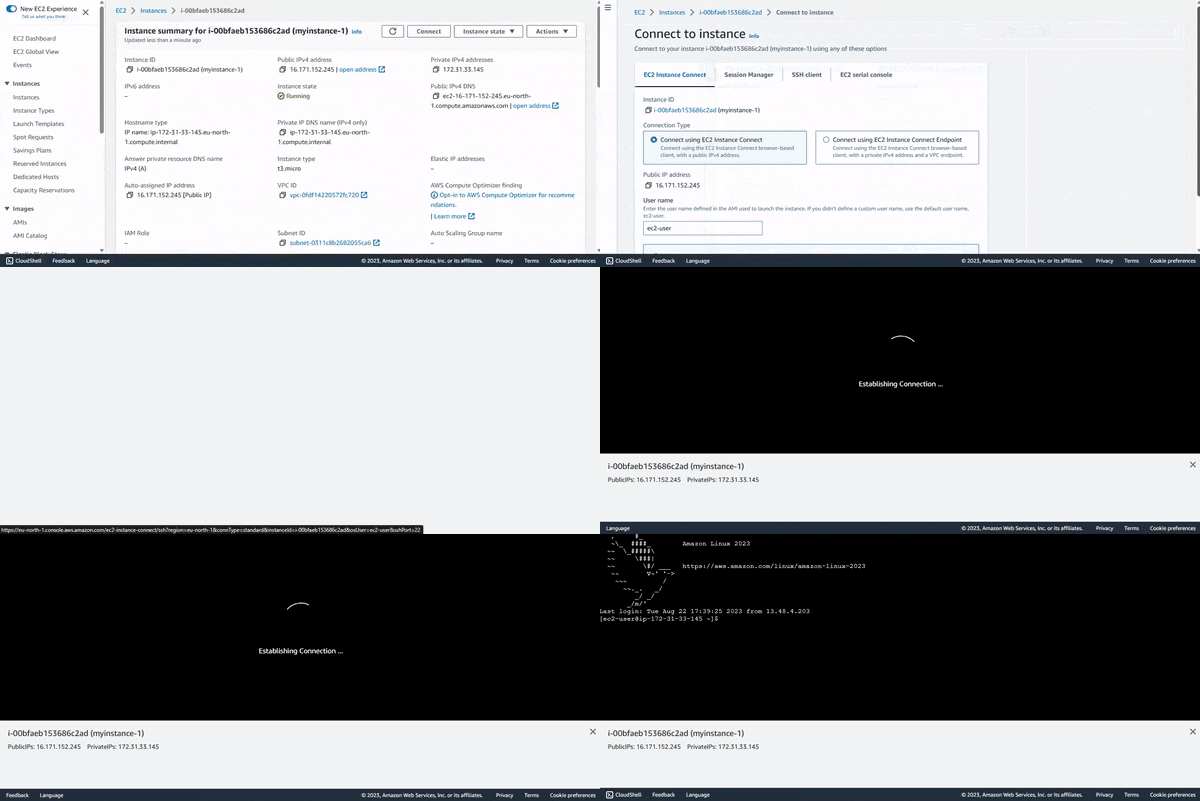
These diverse connection methods enable you to interact with your EC2 instance efficiently and securely, catering to various use cases and preferences.
In this post, I will use SSH to access the Instance on Amazon Linux via the command line. To connect to your Instance via SSH you have to first navigate to the directory/path where your key pair (.pem file) is located and then run a command following this pattern in the command line
ssh -I”/path/key-pair-name.pem” instance-user-name@instance-public-dns-name
path/key-pair-name.pem refers to the path to your .pem file but you can simply enter the name of the file without the path if you’re connecting to your Instance from a directory that contains the file, instance is often ec2 and username is often user although you may want to read your Amazon Machine Image usage instructions to check if the AMI owner has changed the default AMI user name, finally your public-dns-name refers to an IPv4 address assigned to your Instance that allows you to access your Instance on the Internet. To find the public-dns-name of your instance, go to your Instance details and check for Public IPv4 DNS. I have indicated in the image below, just copy it and add it to your command.

So following that pattern, this is the command I will execute in the command line to connect to MY Instance
ssh -i "my-key-pair.pem" ec2-user@ec2-16-171-152-245.eu-north-1.compute.amazonaws.com
On your first attempt to connect to your Instance you will be prompted with a response requiring you to grant permission to add your Public DNS name to the list of known authentic hosts allowed to access your Instance.

I will simply reply with yes. You can do that or enter the fingerprint (indicated above). Once you have chosen your preferred response for establishing the authenticity of your host (public DNS name), you will get a response similar to the image below signifying that your host has been permanently added to the list of known hosts.

If your connection closes like mine, connect to your Instance once again and this time you get a response similar to the image below
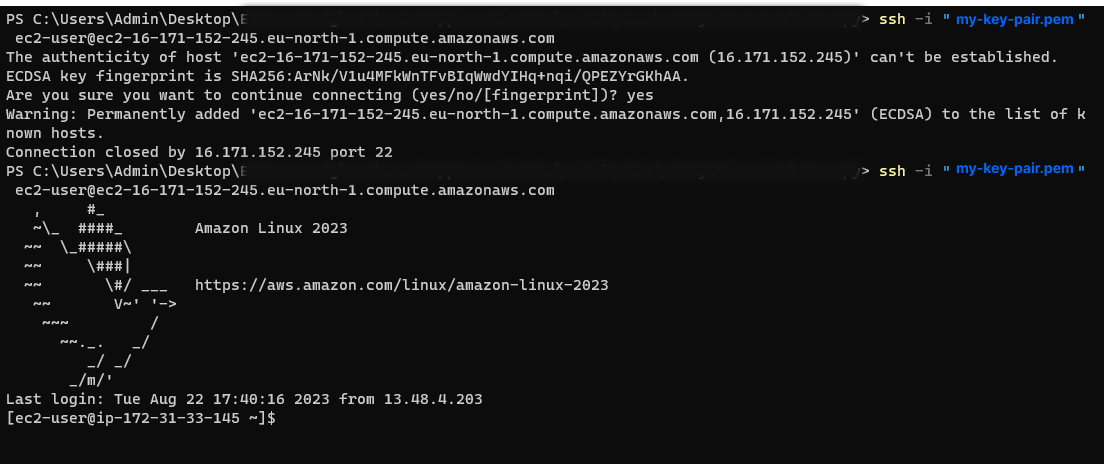
If you get this response, then congratulations! You have successfully connected to your EC2 Instance in Amazon Linux via SSH.
Install NPM/&Node
Since you intend to deploy a Node.js application to this Instance, you have to install Node and package manager (NPM or Yarn) in your Amazon Linux Instance using Yum to set up your node.js development environment. To do this, you can either directly install node package manager (npm) by simply running the command in your terminal
$ sudo yum install npm
This should allow you to easily run your node.js application in this instance and manage and install JavaScript packages and libraries for your application OR you can run the following command in your terminal
curl -o- https://raw.Githubusercontent.com/nvm-sh/nvm/v0.39.3/install.sh | bash
This will install node version manager (nvm), you will use nvm to install Node.js as nvm can install multiple versions of Node.js and allow you to switch between them. I will not go deep into this method now but you can get a more detailed explanation of this method on AWS documentation. For this post, I shall install npm directly.
Import your Source code
There are multiple ways to import your code to your Instance. You can import your code files from your Windows computer by using WinSCP or use a utility like rsync to efficiently transfer your code files from your local storage (your computer) to remote servers (your Instance) or you can be like me and use the most straight forward method which is to use git to download your code from your source code management platform which is Github in my case (and hopefully yours).
To import your source code to your instance from Github, you should first install Git by executing the command.
$ sudo yum install git
You will then use git clone to download the source from your Github repository to your Instance via the command
git clone https://Github.com/Dukesanmi/my_nodejs_project.git
This may prompt you to authenticate your Github account (If it's a private repo). To do this, enter your Github username in response to the first prompt that requests your username, When you enter your correct username you will be prompted to enter your password. Here’s where it gets a bit tricky, the password you are to provide here is not going to be the password to your Github account. Github has revoked the support for password authentication since Aug 2021, so you will have to enter your Github Personal Access Token as the password. Check out Github Personal Access Tokens to learn more about them and how to generate them.
NPM install your dependencies
Once your code has been downloaded to your instance from Github, run
npm install
in the directory that contains your code (specifically the package.json file) to install your project’s dependencies and ensure your code runs locally on localhost without any errors.
Run your code locally
Once you have confirmed that your code runs fine in your Amazon Linux terminal (i.e. you ran the code in your Instance on localhost:portnumber and it ran smoothly with no errors), you can then test it in your browser and your URL will be the port number your project runs on locally appended to your public IP address in case of the Instance in this post my URL will be something like
http://16.171.152.245:8000/
Ensure you run via HTTP and not HTTPS (you don’t have HTTPS privileges yet lol). Also, make sure you switch out 16.171.152.245 for your public IP address.

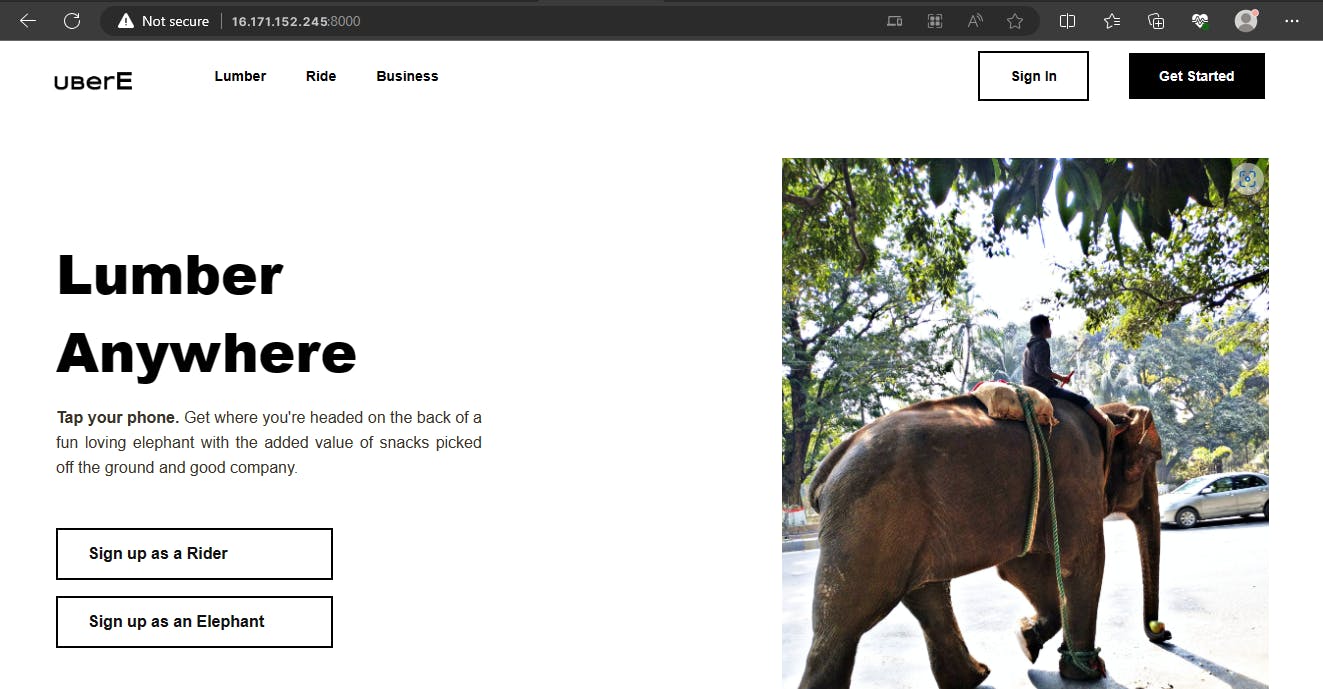
Note: For this to work, you must have an Inbound security group rule that allows inbound traffic to your server on your localhost port number. If you don’t have such a rule, navigate to your instance details, You will see a tab beside the details tab named security, click on it and then you will see the security group your Instance is using. Click on the security and scroll down in the security group view to see and click the Edit inbound rules button, you will be taken to a view that enables you to manage your inbound rules. So you can now add a new inbound rule setting Type to Custom TCP and Port range to your local port number. You can check out my previous post to see how to create inbound security group rules.
Create and manage a node service with systemd
At this point, your application only works on the internet when you manually run it in your Amazon Linux Instance locally from your computer, this is not ideal as it’s no different from running your application using localhost.

You want your application to be available on the internet whenever it is accessed on any authorized device, from any authorized location. To achieve this, you can create a service to manage your node app. This service will be managed in Systemd to reliably ensure that your application is always running smoothly (i.e. starting, stopping, restarting, monitoring and occasionally fixing issues to keep the application running). This means that Systemd will ensure that the application is available to users at all times even when your Linux terminal or/and your local computer is off as long your Instance is running remotely on your AWS account, your application should be running smoothly on the internet.
So let’s create the node service to manage your node application. First, we will create a service file (I will name mine node-api.service) in the system subdirectory of the systemd directory that contains configuration files for system-wide services and units. These files define how systemd should manage various system services, like network services, daemons, or custom applications. The contents of this directory are owned by the root user so we will be making use of the sudo prefix to execute commands in this phase of the process.
Let’s get to it! To create your service file, you can use Vim (if you enjoy a challenge) or Nano as your editor, and I will be using Nano. Thank you and God bless 🙏🏿. So to create your service file in the appropriate directory, you will execute the command
$ sudo nano /etc/systemd/system/node-api.service
This should open up a new file inside which you should input the following content
[Unit]
Description=Uber Elephants #Brief description of your service and maybe what it does
Documentation=https://example.com #Link to application’s docs
After=network.target

[Service]
Type=simple
User=ec2-user #User account under which a service should run.
EnvironmentFile=/home/ec2-user/mycode/myapp.env #Path to your environmental variables file
ExecStart=/usr/bin/node /home/ec2-user/mycode/my_nodejs_project /index.js
Restart=on-failure

[Install]
WantedBy=multi-user.target
Let me quickly give a brief explanation for the parts of the file’s content that are not self-explanatory
[Unit]
After=network.target: This tells systemd to wait until the point in the boot process when the network services are up and running before starting up your application.
[Service]
Type=simple: This tells systemd that your service is a simple, straightforward program that runs as a single process i.e., it just starts and runs, it doesn't involve complex forking or management. This means that systemd will start your service and consider it running as long as the main process (which in this case is your index.js script) is active.
ExecStart=/usr/bin/node /home/ec2-user/mycode/my_nodejs_project /index.js: This specifies to systemd the command that should be executed to start a service. In this case, the command tells systemd to run your entry point file.
/usr/bin/node: This is the path to the Node.js interpreter executable (node). It tellssystemdto use node.js to run your application. This path will be a little different if you installed node.js usingnvm, you will have to use the path to your node.js interpreter executable which is likely to be something like/home/ec2-user/.nvm/versions/node/v18.15.0/bin/node/home/ec2-user/mycode/my_nodejs_project/index.js: This is the full path to the JavaScript file that serves as the entry point for your node.js project. When the service starts,systemdwill execute this file using the node.js interpreter specified in/usr/bin/node.
Restart=on-failure: This specifies to systemd the condition under which the service should be automatically restarted if it dies.
[Install]
WantedBy=multi-user.target: This ensures that your service starts as part of the normal system startup process when the system is ready to serve multiple users and services.
You can now save the file and exit the nano editor.
Once your node service file has been saved you can now use systemctl to control and manage your service. First, check the current state of your service, To do that execute the command
$ sudo systemctl status node-api.service
(Remember to replace node-api.service with your service file name.) You should see a response like this:

You can see that your service is currently disabled and inactive so you have to change that. To enable your service run the command
$ sudo systemctl enable node-api.service
You should get a response like this to confirm that your service has been successfully enabled.
Created symlink /etc/systemd/system/multi-user.target.wants/node-api.service → /etc/systemd/system/node-api.service.
This means that a symbolic link has been created for your service to help systemd efficiently manage your service. The next thing you do now and whenever you make changes to your service file is to run the command.
$ sudo systemctl daemon-reload
This will reload all unit files, rerun all generators, and recreate the entire dependency tree with your updated service files.
Now you can start your service by running the command
$ sudo systemctl start node-api.service
(Again, do not forget to switch out node-api.service for the name of your service file). Run the status check command again and if your service has started successfully, you should get a response similar to this.

To test that this works fine, exit your terminal and close it even or try the previous URL http://16.171.152.245:8000/ in your browser and on another device. You will see that your application will keep running fine without having to manually run it locally.
Install and setup NGINX as a reverse proxy server
Now your application runs automatically from anywhere, on any device as long the correct URL is requested but you still have to add your port number to your IP address to be able to access your web application on the internet. This is because your application only listens on your custom port number and not the standard HTTP/HTTPS port number.
To change that and be able to access your website without your localhost's port number i.e. in my case http://16.171.152.245/, your application will have to listen on port 80 to use HTTP protocol to load your webpages (still don’t have HTTPS privileges yet).
To make all of this possible, you need a reverse proxy server that will act as a middleman between a user’s device and your web application, ensuring your web requests get to the right place and return the web pages or data that is requested.
You can and should use NGINX as your reverse proxy server. Start by installing Nginx on your Linux Instance. Execute the command
$ sudo yum install nginx –y
Once your installation is complete, run to enable your nginx service
$ sudo systemctl enable nginx
And then start your nginx service by running this command
$ sudo systemctl start nginx
Once it has started successfully, you can check nginx service status by executing the command
$ sudo systemctl status nginx
Your response should look something like this

Now when you run your website in the browser without adding our custom port number, the server returns the nginx default “Welcome” page.
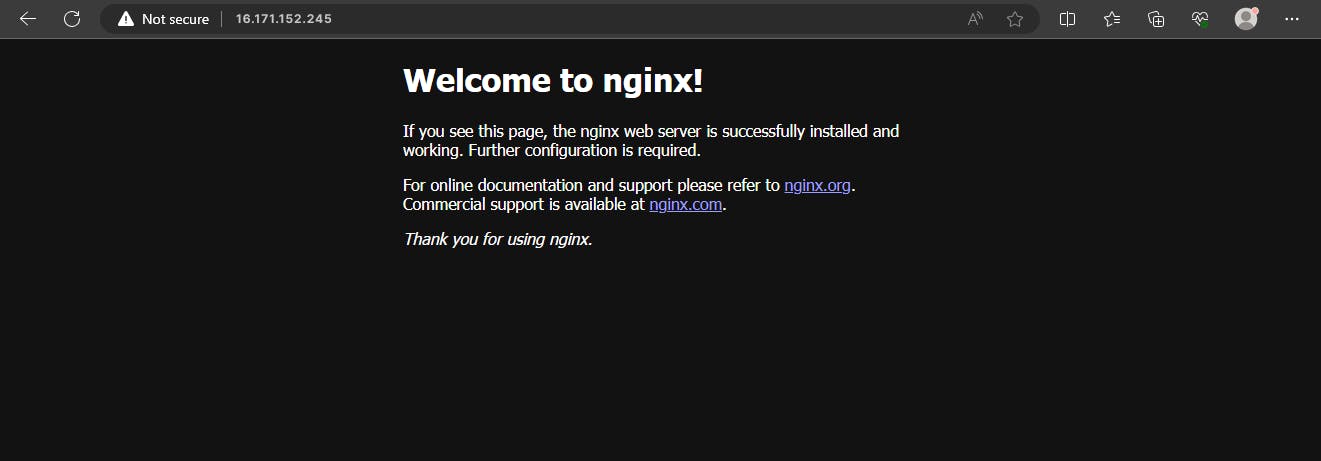
The next thing to do now is to configure nginx to direct requests to your node.js project so it will serve your webpages and data when requests are made to our server through HTTP. We would create an nginx configuration file for our application by executing this command
$ sudo nano /etc/nginx/conf.d/node-app.conf
and then add the following configuration to the file
server {
    listen 80;
    server_name 16.171.152.245; #Your domain name or ip

    location / {
        proxy_pass http://16.171.152.245:8000; #your_nodejs_port
        proxy_http_version 1.1;
        proxy_set_header Upgrade $http_upgrade;
        proxy_set_header Connection 'upgrade';
        proxy_set_header Host $host;
        proxy_cache_bypass $http_upgrade;
    }
}
Your server_name at this point is your public IP address and you should replace the port number on your proxy_pass with the port number your node.js application is running on locally. Save and exit your editor, then run the command
$ sudo nginx –t
This is to test the configuration for syntax errors, if there are no errors you should get the response below

If you get the above response, run the following commands
To reload all the systemd units and generators
$ sudo systemctl daemon-reload
And then restart the nginx service by running.
$ sudo systemctl restart nginx
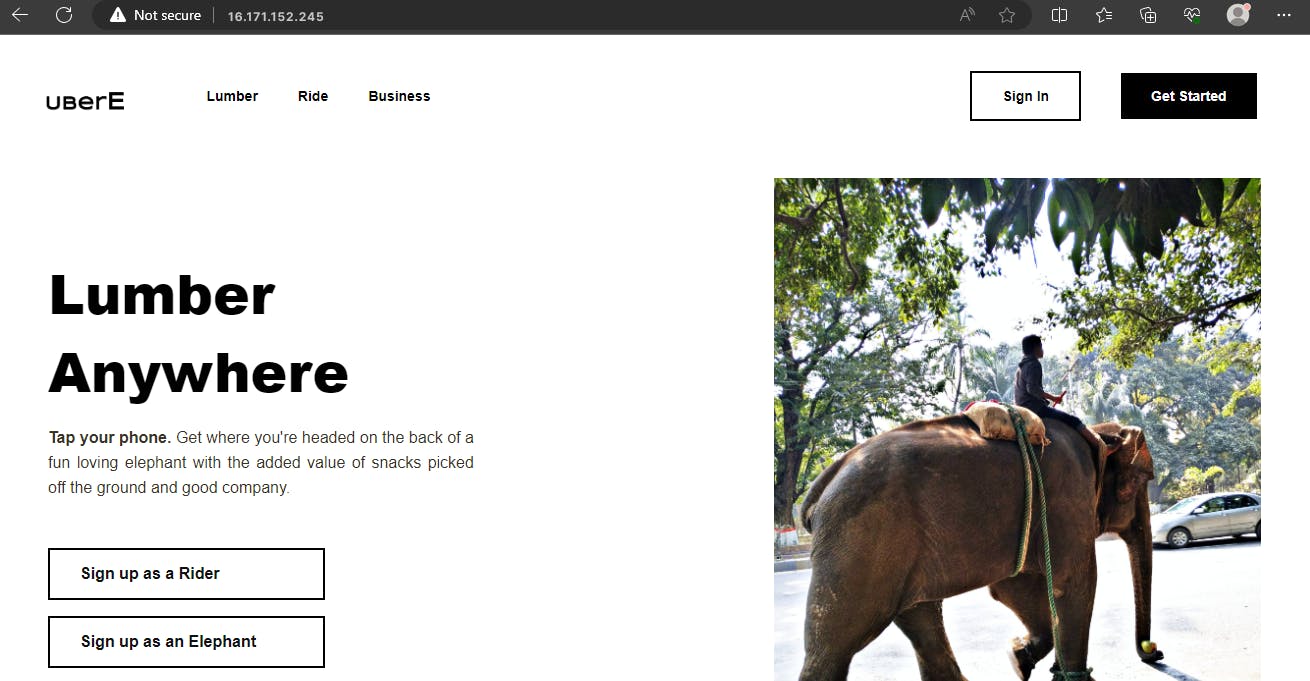
You can now check the status of your nginx service to ensure it's still running fine and then go to your browser and refresh your URL which I believe is currently just your public IP address over HTTP, it should return your application's webpage.
Create name servers for your domain in Route 53
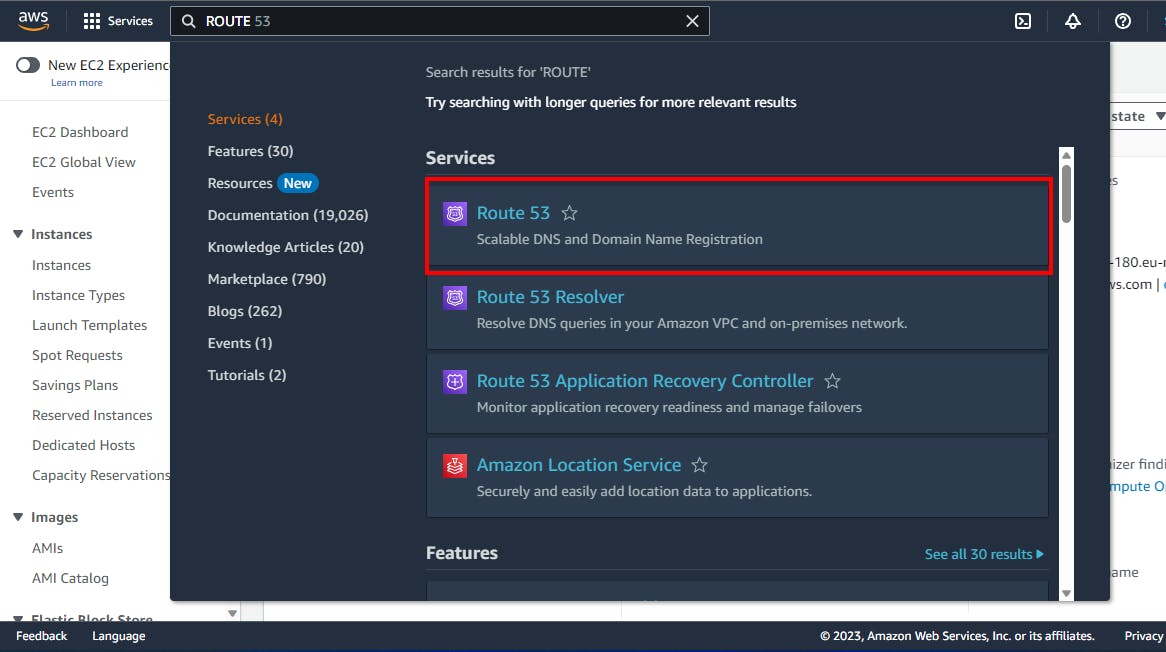
At this point, I assume you already have a domain name you intend to host your website with but if you are not sure how or where to purchase a domain name, you may want to check out one of the many domain name providers available today like Namecheap, Whogohost or AWS Route53. Once you have purchased a domain name, go to AWS Route 53 (a DNS management service) dashboard and under DNS Management, click on “Create Hosted Zone”
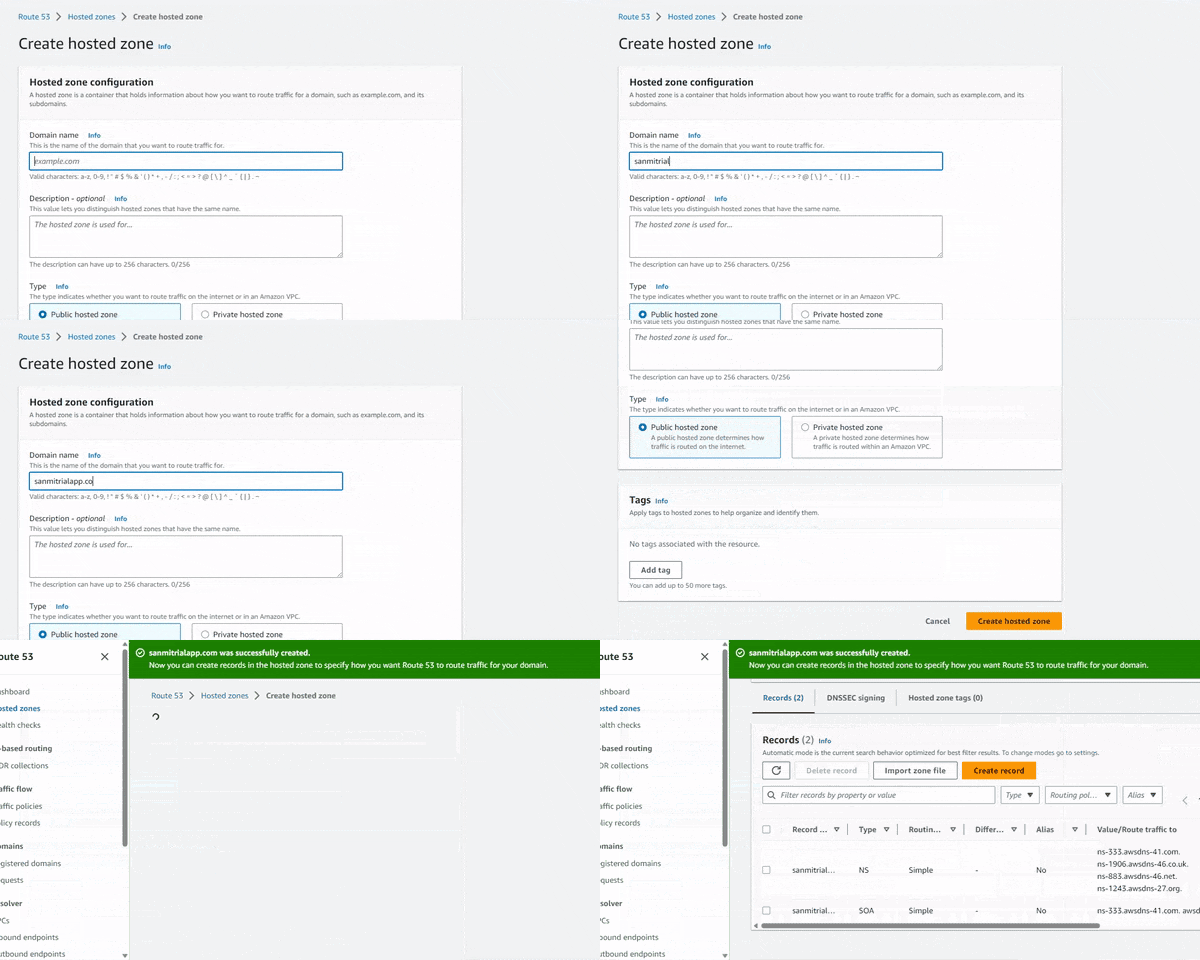
Once you have created your hosted zone, update the name servers assigned to your domain name by your domain name provider with the new ones assigned to your hosted zone by AWS (This will be done with your domain name provider).
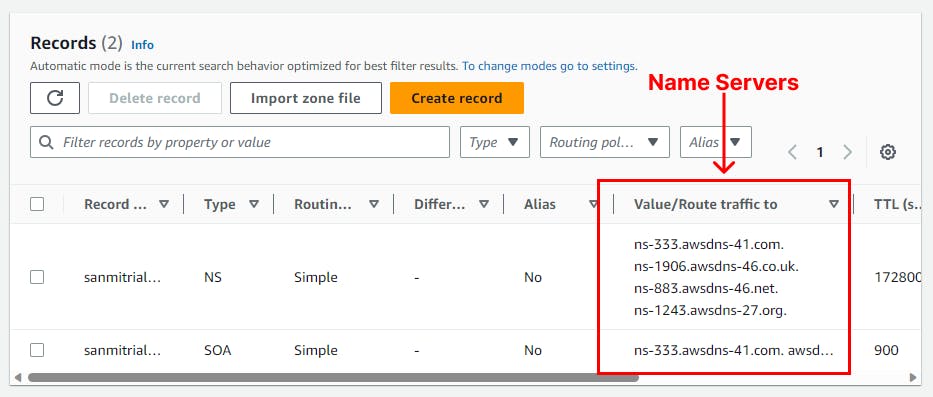
Check that your newly updated name servers have been propagated by checking your domain name on a DNS propagation check service like dnschecker.org (Propagation often takes some time so be a little patient).
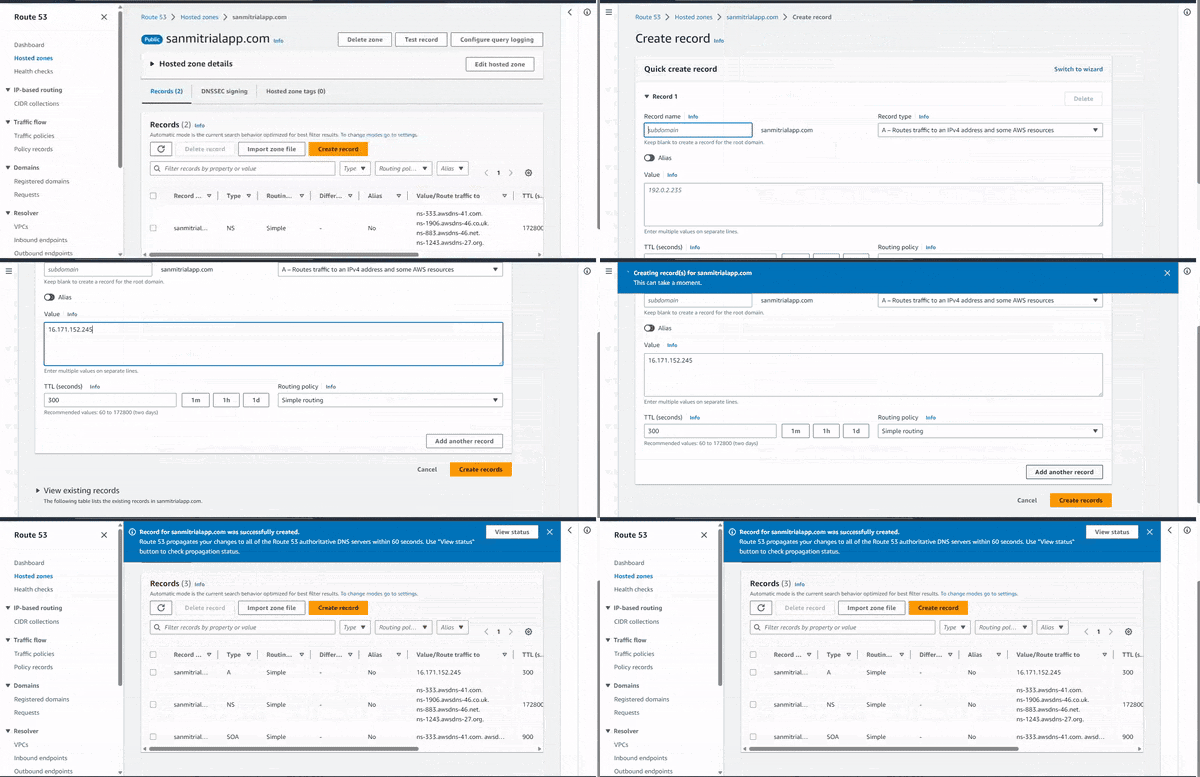
Once you have confirmed that your name servers have been propagated, go back to Route53 where you created a hosted zone and create a new record inside your hosted zone. In the new record enter your public IP address in the value field so whenever your domain name URL is entered in a browser it re-routes to your public IP which then via nginx serves your webpage.
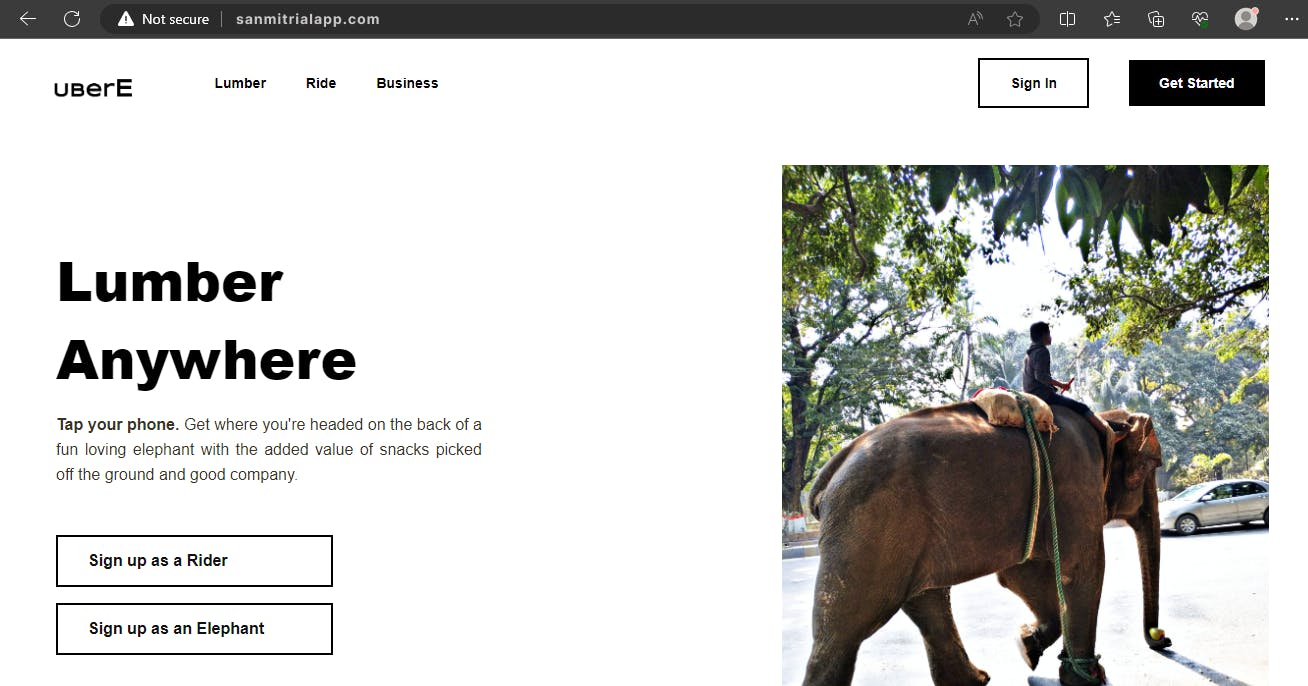
Now, enter your domain name as your URL in the browser using HTTP (still don’t have HTTPS privileges yet. Remain small lol) for example yourdomainname.com. Access to your web application on the internet is now really straightforward for your users with your custom domain name instead of the more complicated IP address numbers.
Get SSL certificates and enable HTTPS
So far, any connection to your website has been unprotected and any data transferred over HTTP will have been transmitted in plain text without any encryption. If packets of data to or from your website were intercepted, it would be easy for the interceptor (lol) to read and alter that data. This lack of encryption makes HTTP unsuitable for transmitting sensitive or confidential information, as it can make your web application vulnerable to eavesdropping, data breaches, and man-in-the-middle attacks.

To prevent these kinds of vulnerabilities in your website, you have to enable HTTPS, a secure version of the HTTP that uses SSL (Secure Sockets Layer)/TLS (Transport Layer Security) for encrypting data transferred between your application’s server and client by concealing data in layers of encryption so that in the case of interception, it will be nearly impossible to decipher without the correct decryption key. It is essential for every website especially if your website sends or receives sensitive data such as passwords, security keys, credit card information, bank information etc.
To enable HTTPS on your website, you need an SSL/TLS certificate which is a digital certificate that authenticates a website's identity and enables encrypted connection. I will show you how to obtain an SSL certificate from Let’s Encrypt and enable your website to run on port 443 which is the standard port number for HTTPS protocol.
For Let’s Encrypt, you need to install Certbot. Installing Cerbot on Amazon Linux 2023 may present itself to be a struggle as EPEL 8 version of Certbot is built for a version of Python (v3.6) that is not available in Amazon Linux 2023. So you have to manually install it using Python by the following process I have highlighted below:
First, run these commands to set up the Python3 virtual environment
$ sudo python3 -m venv /opt/certbot/
$ sudo /opt/certbot/bin/pip install --upgrade pip
Then to install Certbot for Nginx, run the command
$ sudo /opt/certbot/bin/pip install certbot cerbot-nginx
Afterward, to enable you to use the Certbot command run
$ sudo ln -s /opt/certbot/bin/certbot /usr/bin/certbot
You can now obtain your SSL certificate by running
$ sudo certbot –nginx
This will also allow Certbot to automatically modify your Nginx configuration to enable HTTPS. When you execute that command, you will be prompted to provide an email address so you can be contacted in case of urgent renewal and security notices.
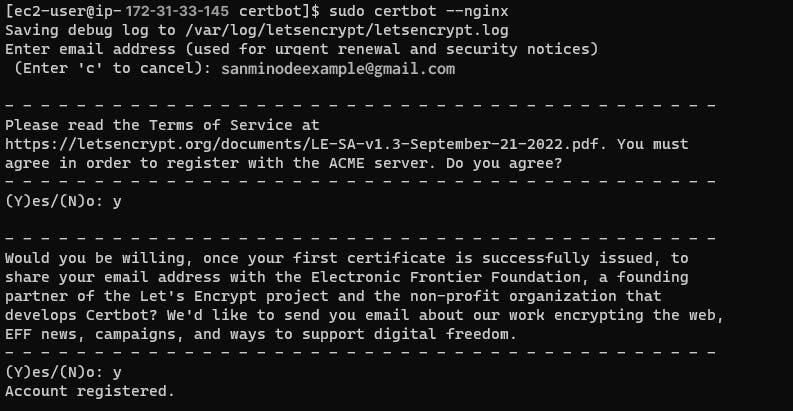
Respond appropriately to the other prompts (just type in y) and when your account is registered, you will see the view below asking you to select the domain you want to enable HTTPS from a list.
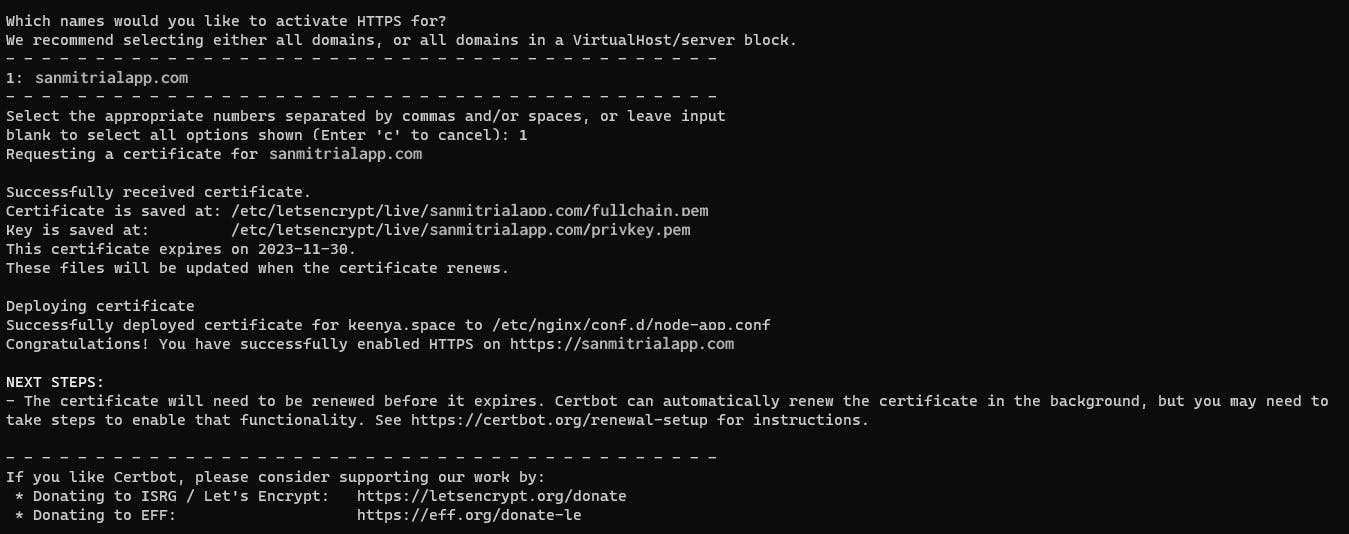
You will likely see your domain there, this is as a result of the record you previously created in your Hosted Zone in Route 53 which points to your server’s IP address and Certbot detecting it as an available domain because it can potentially match subdomains under that wildcard domain.
You have finally earned HTTPS privileges 👏🏿, you can now access your website using HTTPS in your URL like https://yourdomainname.com
There is one more tiny detail you should take care of. Your newly obtained SSL certificate will expire after some time (typically 90 days I think) and you may not always remember to manually renew it. So execute the following command to automatically renew your certificate days before it expires using a cron job.
$ echo "0 0,12 root /opt/certbot/bin/python -c 'import random; import time; time.sleep(random.random() 3600)' && sudo certbot renew -q" | sudo tee -a /etc/crontab > /dev/null
Thanks, oxFedev!
To check your auto-renewal configuration, view your domain config file at
$ sudo cat /etc/letsencrypt/renewal/yourdomainname.conf
You should see the number of days before expiry Certbot will auto renew your certificate.
Conclusion

Congratulations! You are now capable of using AWS EC2 Instance to deploy your Node.js project as a secured web application to the streets of the internet for the entire world to interact with, proud of you 🙌🏿. See you on the next one! Cheers ✌🏿